
Creating a honey extraction room can make the whole job of harvesting and processing honey way easier, less sticky, and a lot more enjoyable. If you want to keep things clean, efficient, and up to food-safe standards, getting your setup right from day one goes a long way. I’ll walk you through what’s really important for setting up your own honey extraction space, covering layout, climate control, cleaning tips, and the gear that’ll help you get sweet results every time.
Why a Dedicated Extraction Room Makes Life Easier
Having a space set aside just for extracting honey keeps things organized and hygienic. Bees are always curious about the smell of honey, so having a closed room keeps those little visitors out of your hair (literally). Plus, it gives you a place to store tools and equipment where you know they’ll be ready to go when the next harvest rolls around.
If you’re running a small operation with just a few hives, your extraction spot might just be a corner of the garage or a garden shed. For larger setups, a purpose-built room or shed really pays off in cleanliness, efficiency, and sanity. Even if you start small, thinking ahead about expanding your space will make future harvests smoother. Consider if your property has a seasonally heated outbuilding or a back porch that can be easily enclosed; these can make excellent spots for honey work.
Choosing the Right Location
When picking or building your extraction room, there are a few things I always look for:
- Easy access: You’ll need a spot that’s not a hassle to get to with heavy boxes of honey frames. Make sure there’s a straight path from your hives to the door—it saves your back after a long day.
- Good ventilation: Heat and humidity from extracting honey and wax can build up fast, so airflow is always a bonus. A window or exhaust fan makes a huge difference, keeping the air fresh.
- Beeproofing: Doors and screens that seal tight keep your operation peaceful and stingfree, helping you work without the buzzing distractions.
- Running water: Cleaning up isn’t optional when honey’s involved. A proper sink, or at least a hose spigot, is pretty handy. Even a simple handwashing station adds a lot.
If you’re short on space, look for a room that you can dedicate during honey season—even a laundry or utility room can work in a pinch, as long as you clean up very thoroughly before and after. Think about storage, too: can you fit your buckets, extra jars, and unused frames comfortably for the rest of the year?
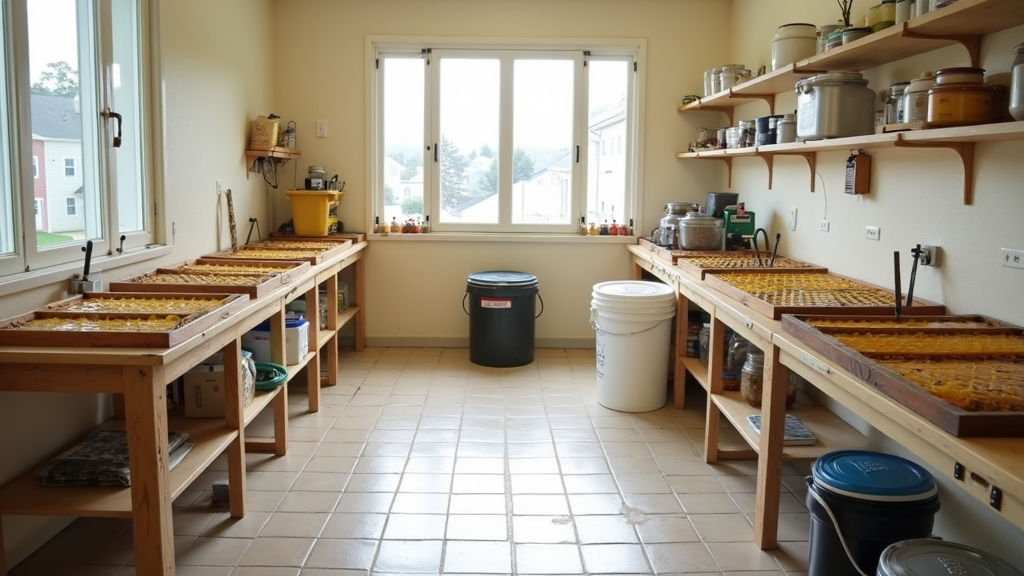
Perfecting Your Extraction Room Layout
The actual workflow of extracting honey gets smoother when you set up your space in a logical order. Here’s a layout I’ve found to work really well:
- “Dirty” area: This is where you bring in the full honey supers straight from the hive. If some stray bees hitch a ride, set up a “bee escape” area (a screened porch or side room) so you can get rid of them calmly. Place a small table here for inspecting frames before bringing them deeper inside.
- Uncapping station: Honeycomb frames need the wax caps sliced off before you can spin out the honey. A table with a food-safe trough or tub to catch cappings is super useful here. Some folks like to use a heated knife, while others use a serrated bread knife and a plastic fork for tough spots.
- Extraction zone: Your extractor (manual or motorized) goes here. Leave space around it for buckets and for moving frames safely in and out. The area should be well lit for watching honey levels and keeping things tidy.
- Filtering corner: Have a spot to rest buckets under strainers to filter out any stray wax bits before storage. Fine mesh and cheesecloth are both popular filtering choices, depending on how pure you want your honey.
- Clean storage: Finally, an area for sealed buckets, clean jars, and washed tools keeps finished honey safe until bottling. Stackable shelves or food-safe bins help keep everything organized and off the floor.
Try to keep the direction you move the frames, honey, and tools one way, so you’re not tracking sticky drips all over the place and contaminating clean gear. Keeping a visible path reduces confusion and avoids cross-contamination between “sticky” and clean zones.
Must-Have Equipment for a Honey Extraction Room
Having the right tools on hand makes the whole job a lot smoother and less timeconsuming. Here’s what I always keep handy in my honey extraction space:
- Extractor: The centerpiece! Manual hand crank extractors are great for just a few hives; electric models are awesome if you’ve got lots of honey to spin out. Look for stainless steel barrels for easy cleanup. If you join a local beekeeping club, see if they rent extractors during harvest season—it’s a great, budgetfriendly way to try before you buy.
- Uncapping knife or fork: Heated knives work really well for slicing wax cappings, while a simple uncapping fork does the trick (sometimes both are needed!). Use a foodgrade tray underneath to catch all the wax bits.
- Buckets with honey gates: Food grade buckets with a spigot at the bottom make transferring honey a breeze and keep spills to a minimum. Always cover buckets with loose-fitting lids while working to keep out dust—and nosey bees.
- Double or triple sieve strainer: These mesh filters remove bits of wax and bee debris before you store or bottle your honey.
- Plastic trays or catch pans: It’s pretty much impossible not to drip honey. Place trays under your uncapping tank and extractor. Extra drip trays come in handy for tools and sticky spatulas.
- Cappings tank: Some folks use a foodgrade tub to catch uncapped wax, where the dripped honey can settle out for collection later. Letting the cappings tank sit overnight at a warm temperature helps all the honey run off the wax.
- Protective gear: Even inside, honey attracts bees, so a bee jacket or veil, and gloves, come in handy during busy harvests. Use slipresistant shoes since even the cleanest extraction can get slippery underfoot.
- Honey Refractometer: Using a honey refractometer is essential for any beekeeper preparing honey for sale or long-term storage. By measuring the moisture content precisely, you can ensure your honey is below the safe threshold (typically 18% or less), which prevents fermentation, spoilage, and quality loss. Even honey that looks thick can still hold more moisture than expected, especially after humid weather or uncapped frames. A quick refractometer reading protects both your product and your reputation—helping you deliver a stable, high-quality honey that customers can trust.
Stainless steel is best for anything in contact with honey, since it’s super easy to clean and doesn’t react with acids or sugars. Invest in a few extra foodgrade buckets; you’ll never regret having spares on a busy day.
How to Keep Honey Extraction Spaces Clean
If you’ve ever spilled honey anywhere, you know how sticky things can get fast! A good extraction room is easy to clean and lets you avoid longterm mess. Here are some tips I’ve learned the hard way:
- Nonporous surfaces: Use stainless steel tables and tiled or vinyl flooring because honey wipes off easily. Bare wood soaks up honey and is much harder to sanitize.
- Washable walls: Painted drywall with glossy or semigloss paint, or washable wall panels, help a ton when splatters happen. Consider adding a low wall border made of vinyl so you can mop up spills without damaging the baseboards.
- Warm water: Honey dissolves with hot water, so a utility sink or deep laundry sink is super helpful for washing buckets, tools, and trays. Do a prewash with hot water, then a thorough soap rinse, finishing with a hot rinse.
- Damp towels and sponges: I keep a stack of old towels and a few sponges close, making it easier to wipe up sticky patches on the spot. Reusable microfiber cloths make cleaning a snap—just toss them in a hot wash when you’re done.
- Regular deep cleans: At the end of every extraction session, I make it a point to clean all equipment, sweep and mop floors, wipe down walls, and doublecheck for drips or spills. Let equipment air dry in a clean spot before putting it away. Keeping up with this routine is key for food safety and for keeping next season’s work easier.
Doing an extra deep clean before and after honey season helps get rid of any lingering odors or residues that might attract unwanted guests during the off months.
Dealing With Humidity, Temperature, and Light
Honey flows better when it’s warm. I always aim to keep my extraction space between 75°F and 85°F (24°C-29°C). If your honey is too cold, it won’t spin out of the comb easily, and you’ll spend more time and sweat for less reward.
If you’re extracting in humid weather or in a damp basement, a dehumidifier can help prevent honey from soaking up extra moisture, which could lead to fermentation in storage. Good lighting, especially natural daylight, is key for spotting wax bits and keeping an eye out for unsanitary drips or spills. If windows are limited, bright LED shop lights usually work well and don’t add extra heat. Consider light placement, so shadows don’t hide sticky spots or leftover wax.
If you ever need to warm up cool honey supers before extracting, bring them into the room a day in advance, letting the honey warm gently to room temperature for smoother spinning. This trick can save lots of elbow grease and get you more honey out of your frames.
Food Safety and Local Rules
Depending on where you live, health and food safety rules might apply if you want to sell your honey. Even for personal use, keeping your space food-safe matters. Here’s what I keep in mind:
- Wash hands and wear gloves: Clean hands or food safe gloves cut down on sticky mess and the risk of contamination.
- Separate from animals and chemicals: Never extract honey in the same space you store fuel, pesticides, or let pets roam.
- Label and date your finished honey: Mark the extraction date and floral source if possible, especially for sales or gifts. This also helps you keep track of year-to-year harvests for your records.
- Check local regulations: If you’re selling honey, check if you need permits or inspections; there may be different rules for direct to customer vs. wholesale sales. You can often find helpful resources through your local beekeepers club or county extension office.
Common Questions About Extraction Rooms
Here are a few questions I often hear from folks setting up their first honey processing room:
Question: Can I extract honey in my house or kitchen?
Answer: You can, but be prepared for sweet, sticky everything unless you’ve cleared the space and lined counters and floors. Dedicated spaces make life a lot easier, but if you go this route, deepclean everything as soon as you’re done.
Question: Do I need an expensive extractor?
Answer: Not at all! Simple manual extractors work for most backyard beekeepers. Larger extractors can be pricey, but some local bee clubs offer equipment rentals or shared spaces. Reach out early before harvest time to reserve your spot if equipment is in high demand.
Question: How do I keep bees out of my extraction room?
Answer: Extract after sunset or in fully sealed rooms. Use screens or double doors if needed. Be prepared; any honey spill outside is sure to attract visitors fast!
Bottom Line: Making Honey Harvests Simple and Fun
Getting your honey extraction room set up right saves time, cuts down on mess, and helps you get the very best out of your hard work in the bee yard. Clean, wellorganized spaces don’t just look good; they make the whole hive to jar process smoother. Start small, adding new tools and tweaks as you grow your beekeeping adventure, and you’ll find the season’s harvest feels less like a chore and a whole lot more like a sweet reward. With the right setup in place, you’ll be ready for sticky days and golden payoffs—enjoy every drop!
I think this is a great article! It’s really helpful for anyone who wants to start producing their own honey. The tips you shared about setting up a clean and organized extraction room, plus the practical advice for handling bees and equipment, can benefit a lot of people getting into beekeeping.
Just wondering — for someone starting out, would you recommend using a manual or electric extractor?
Hi Mohamed!
Thank you for the kind words! I’m really glad you found the article helpful. For beginners, a manual extractor is often a great starting point—it’s more affordable and perfect for small-scale operations. However, if you plan to expand or have multiple hives, an electric extractor can save a lot of time and effort, especially during peak harvest. Start small, and upgrade as your apiary grows! Please, check the tab “The Ultimate Guide To Choosing The Right Honey Extractor” under the section “Honey Production And Marketing”.
/Mats
This is such a detailed and helpful guide—thank you for breaking down every step so clearly! ???? I especially appreciated the practical layout suggestions and the emphasis on food safety—super important but often overlooked.
A few questions came to mind while reading:
Do you have any tips for beekeepers with very limited space? Could a temporary indoor setup work if cleaned thoroughly?
How do you handle wax cappings after extraction—do you process them for reuse, or sell them?
What’s your take on using a warming cabinet to gently heat honey before bottling—worth the investment for small-scale setups?
Have you found any clever ways to bee-proof a space that doesn’t have a fully sealed door (like an outdoor shed with gaps)?
Would love to hear how others set up their extraction rooms too! What gear do you consider essential, and what did you wish you had earlier in your beekeeping journey?
Hi Raymond!
Thank you so much—I’m glad the guide resonated with you! For small spaces, a temporary indoor setup can absolutely work if thoroughly cleaned and well-ventilated—just watch humidity levels. Wax cappings are gold! You can render them down for candles, lip balm, or sell to local crafters. A warming cabinet is helpful if your honey crystallizes, but not essential early on—sunlight or a warm water bath can also work. To bee-proof sheds, try using fine mesh over gaps and work during cooler hours when bees are less active. And yes—a capping scratcher and uncapping tank were game changers I wish I’d had sooner!
/Mats