Packaging honey for sale might feel a bit daunting at first, but it’s also a fun way to show off your hard-earned product. Whether you’re bottling a few jars for a local farmers market or planning to stock shelves in a neighborhood store, making thoughtful packaging choices is important. I’m here to walk you through everything you’ll want to know before sending those sweet jars out into the world.
The Basics of Packaging Honey for Sale
Honey packaging isn’t just about looks. While an eye-catching jar can help you sell more, good packaging is also about keeping your honey fresh, preventing messes, and obeying all the safety and health rules for selling food. The honey market has a long tradition, but nowadays, small producers can do really well by focusing on quality and welcoming presentation styles. Since honey is a natural product, shoppers are paying more attention to what’s in their food and how it’s put together in the first place.
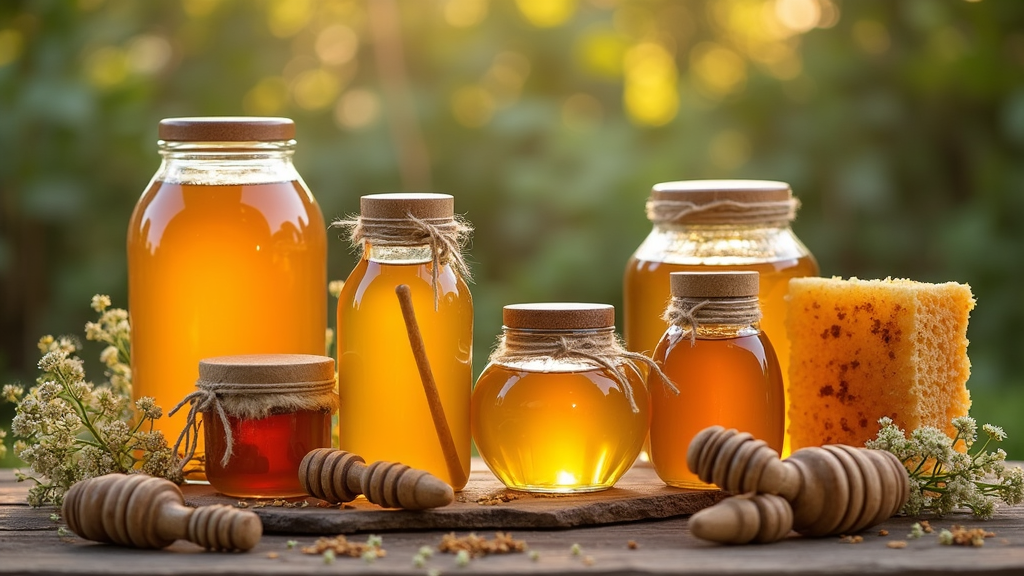
Years ago, beekeepers might give honey away in reused jars. These days there are loads of different containers—glass mason jars, plastic bottles, bear shapes, hexagon jars—letting you get creative with your look while staying safe. Understanding which types work best in your area (and for your buyers) is a smart place to start.
Getting Started: What You Need Before You Bottle
Pouring honey feels like the fun part, but having everything set up in advance makes the work smoother. You’ll want these things ready before filling your bottles:
- Clean, Food Safe Containers: Use jars or bottles labeled foodgrade. Plenty of options exist, from classic mason jars to easy squeeze bottles and unique hex jars.
- Labels That Meet Requirements: Make labels that show the product name, net weight, producer details, and any extras your state might require, like place of origin or an ingredients list. Check your local labeling rules to avoid headaches.
- Sanitation Equipment: Boiling water, clean towels, and foodsafe gloves all keep surfaces and hands clean. Honey hardly spoils, but grimy equipment is a no-no for any food product.
- Proper Bottling Tools: Good funnels, ladles, or special honey gates for buckets keep messes down. These tools save you time and hassle, especially with several jars.
For food packaging, pay attention to your health department’s or local food regulator’s rules. Sometimes a cottage food license does the job; other times you’ll have to work in a professional kitchen. Check in with these organizations early—it gives you confidence and keeps you legal. The National Honey Board has extra tips if you want to dig into more details. (https://www.honey.com/)
Step by Step: How to Package Honey for Sale
A clear workflow makes packaging honey less stressful. Here’s a way to break it down:
- Prepare Your Honey: After extraction, let the honey settle for a couple days so any bubbles or wax float to the top. Many producers use strainers to remove stray wax or bee pieces—this makes your honey look clear and fancy.
- Warm It Up (Carefully): Warm the honey a little (keep it below 104°F/40°C) to improve the flow and reduce stickiness. Don’t use too much heat if you want to keep natural flavor and beneficial enzymes intact.
- Clean Your Containers: Wash bottles or jars with hot, soapy water and rinse thoroughly. For extra cleanliness, use boiling water or a foodsafe sanitizer.
- Bottle Up: Pour honey slowly, using a clean funnel or honey gate. Fill each jar to about half an inch from the top to make sealing easy and prevent overflow.
- Cap and Label: Tighten the lids as soon as possible to keep out moisture or dust. Label right away, while the jars are dry.
- Look for Leaks and Crystals: Turn each bottle sideways for a second to check leaks. If you spot crystallization early, set aside those jars as “creamed” or “spun” honey. They’re still delicious, and some buyers love this texture.
This step-by-step saves you from sticky spills and keeps your honey pure and safe for happy buyers.
Things to Think About Before You Pick Your Packaging
Picking your packaging isn’t only about looks. A smart choice considers your customer and how practical the package is. Let’s look at some key things to keep in mind:
- Material: Glass shows off honey’s natural color and gives a premium feel, but it’s heavier and breakable. Plastic squeeze bottles are popular for kitchens and easy pouring, but some shoppers pick glass for environmental reasons.
- Shape and Size: Tiny jars are great for gifts or samplers, while large ones work for regular customers or restaurant sales. Tall, skinny jars grab attention but need careful pouring; bear shapes and hexagon jars always attract buyers at markets.
- Seal Type: Screw tops are reliable, but for shipping or market tables, tamper-evident seals or shrink bands give peace of mind that the jar hasn’t been opened.
- Airtightness: Good lids keep out moisture and keep honey fresh. Weak seals risk runny messes—especially if it’s humid.
- Cost: Fancy jars are beautiful but can raise your costs. If you’re starting out, standard mason jars or simple squeeze bottles are wallet-friendly. Buying containers in bulk makes sense if you plan to grow your sales.
- Label Space: Wavy or rounded jars sometimes look fun but give you headaches with label placement. Make sure there’s enough flat area to stick your label on straight.
Glass or Plastic: What’s the Best Pick?
I get a lot of questions about glass versus plastic. This is how I think it through:
- Glass Pros: No flavor transfer, easy to wash, looks premium, and can be recycled many times.
- Glass Cons: Heavier, breakable during shipping, and often costs more.
- Plastic Pros: Very light, doesn’t shatter, quick and easy to use. Squeeze bottles are super handy.
- Plastic Cons: Some buyers avoid plastic, it can take on flavors over time, and looks less fancy for gifts.
The best option comes down to your main customers and goals. I like glass for gifts and gourmet honey, but for markets and quick sales, plastic makes life much easier and safer.
Tips and Tricks for Making Your Honey Pop
Sharp packaging gets your honey noticed fast. Here are some tricks to help you stand out and get repeat customers:
- Custom Labels: Design labels with your name, logo, or the flower source (“Wildflower,” “Orange Blossom”). Many online or local print shops do just a few sheets so you don’t have to buy hundreds.
- Tie-Ons and Extras: Pop a little info card or recipe tag on the jar with string. Wood honey dippers tied to jars are always popular at craft shows.
- See-Through Windows: Choose clear packaging or window labels so shoppers see the golden honey inside—folks are drawn in by that natural color.
- Batch or Harvest Dates: Number your batches or write the harvest date. These small touches show freshness and make your honey feel local and special.
- Gift Packs and Samplers: Selling two or three flavors or sizes in a small box or basket makes it easy for someone to pick up a ready-made gift and increases your average sale.
Many customers tell me they don’t even eat much honey but still buy it just because the jar catches their eye. A small extra step, like a dipper or a creative label, can be the little thing that makes folks choose your honey over a neighbor’s.
Common Questions About Packaging Honey for Sale
New beekeepers and first-time honey sellers have plenty of questions about packaging. Here are a few I hear most often, with quick answers:
Question: Do I have to pasteurize or heat-treat honey for sale?
Answer: Most people like raw honey best, so just strain it and keep your work area clean. Overheating ruins flavor and healthy benefits, so stay gentle. Stick to your local laws and you’ll be fine.
Question: How long does packaged honey last?
Answer: Real honey can keep almost forever in a sealed jar. Store it in a cool, dry spot with the lid tight. Honey might crystallize over time—if it does, just warm it gently and it’ll go back to liquid.
Question: Can I use recycled or cleaned jars?
Answer: For gifts among friends, reused jars are fine. For sales, you almost always have to use new, sealed, foodgrade containers—especially new lids for freshness and safety.
Quick Tips to Set Up Your Honey for Success
Packaging isn’t just a tiny step; it’s the first thing buyers notice. Choose jars or bottles that are clear, easy to use, and highlight your honey’s beauty. Labels should be readable and friendly, and those small extras (like dippers or tags) can make sales jump. Follow your local rules, keep everything squeaky clean, and remember: good packaging builds trust with buyers. Happy bottling—here’s to seeing your jars fly off the shelves!
If you’re looking for more inspiration, check out market stalls or specialty food stores to spot what stands out. Soon you’ll get plenty of ideas on how to make your honey packaging next-level cool, helping your jars shine among the crowd.
This is a very informative and practical article! I appreciate how it highlights not just the visual appeal of honey packaging but also the importance of food safety, labeling accuracy, and branding. It’s easy to overlook how much detail goes into making a jar of honey shelf-ready and marketable.
I’ve recently started selling small batches of my own raw honey at local markets, and I’ve found that unique glass jars with eco-friendly labels really help grab attention. One thing I learned is that customers also appreciate seeing the origin and floral source on the label—it adds a personal and trustworthy touch.
Do you recommend any cost-effective packaging options for beginners who are just testing the market? I’d love to hear more about your experience with scaling up packaging without sacrificing quality or brand identity.
Hi AJnaval!
Thank you, and congrats on launching your honey at local markets—that’s a big step! You’re absolutely right: origin and floral source really resonate with customers. For beginners, cost-effective yet appealing options include bulk-purchased glass jars, recycled or kraft paper labels, and print-at-home label sheets for small batches. Many beekeepers also use honeycomb-patterned lids or twine/tags for a handmade touch.
As you scale, look into local co-ops or supplier groups for discounts, and consider label templates with consistent design to save on custom printing while keeping your brand polished. Keep it simple, but meaningful!
/Mats