Beeswax candles have been lighting human lives for centuries, dating back to ancient Egypt and even the Roman Empire. Unlike other waxes, beeswax stands out for its natural beauty and eco-friendliness. It’s a byproduct of honey production, which makes it a more sustainable choice compared to paraffin, which is petroleum-based.
Using beeswax goes beyond just lighting up a room. This wax emits negative ions when burned, which helps to purify the air by bonding with toxins. That’s a fancy way of saying it’s not just the warm glow but also a healthier home environment. Plus, they have a naturally sweet and honey-like scent that doesn’t need any artificial additives.
Before jumping into crafting, you need the right gear.
- Start with high-quality beeswax, available in pellets or blocks. Both have their perks, but pellets melt easier if you’re a newbie.
- Wicks are crucial too—going for 100% cotton wicks is a safe bet to ensure clean burning.
- A double boiler setup is perfect for melting beeswax without scorching it.
- And of course, molds for giving your candles their shape.
Wrapping your head around the materials changes the game, transforming a simple DIY into an art form. Understanding the history, benefits, and essential tools not only elevates your candle-making skills but makes every creation a piece of personal history and environmental mindfulness.
Step-by-Step Guide to Crafting Your Own Beeswax Candles
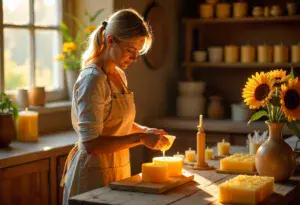
Setting up your workspace right is your first move. You don’t need a fancy studio, just a well-ventilated area and a flat, stable surface. Cover it with newspaper or an old cloth since beeswax is messy stuff. Gather all your materials ahead of time—trust me, you don’t want to be running around mid-melt.
Start by cutting your wick a couple of inches longer than your mold. Thread it through, securing it at the top with a convenient chopstick or pen laying around. Keeps your wick dead center, which is crucial for an even burn.
Melting beeswax needs care and patience. Use a double boiler over low to medium heat, stirring occasionally. You’re aiming for a honey-like consistency, so take it slow and steady. Once it’s ready, pour the melted wax slowly into the mold. Pouring slowly minimizes bubbles and gives you a smoother finish. In general the target pouring temperature of the wax is 68 to 71 °C (155 to 160 °F). A rule of thumb is to allow the wax to cool enough to coat the sides of your pouring vessel as an indication the wax is ready to pour. If the wax is too hot it will cause sink holes and bubbles in the candles.
While the wax sets, don’t rush things. Patience is key. Depending on your mold size and room temperature, setting can take a few hours to a full day. Resist the urge to peek or fuss around with it.
Once solidified, gently remove your candle. Trim the wick to about a quarter-inch to prevent smoking. If the candle doesn’t pop out easily, help it along by chilling it a bit in the fridge. Careful though—too long and you might crack it.
Staying safe is crucial. Beeswax is flammable and hot when melted. Always keep an eye out. Ensure you don’t have kids or pets around, or they’re at a safe distance. Melted wax is hot and can cause burns. No unexpected guests should be near your candle-making zone.
This process is straightforward but calls for focus and creativity. Making your own candles is not just about function; it’s a way of injecting a little piece of yourself into something that also brightens up your space.
Creative Customization and Decoration Ideas
Unleash your creativity by experimenting with various essential oils and natural additives. A few drops of lavender or eucalyptus can add a relaxing aroma while using less common scents could give your candles a bespoke touch. Stir them into the melted wax right before pouring to maintain their potency.
Don’t shy away from experimenting with molds to craft unique shapes and sizes. Silicone molds offer versatile options, from classic cylinders to whimsical shapes. You can even repurpose everyday items like teacups or muffin tins for a quirky, personal touch.
For those looking to take aesthetics a notch higher, consider decorating your candles once they’ve set. Wrap them in dried flowers or herbs, using a thin layer of melted wax to adhere. This not only elevates the candle’s look but can also enhance its scent experience.
Playing with colors is another way to personalize your creations. Natural pigments like turmeric for yellows or spirulina for greens add a splash of color without synthetic chemicals. Add these while the wax is melting to spread the color evenly. Remember, less is often more when it comes to natural dyes.
You can even make simple straight candles from wax partitions for frames. Here you simply place the wick on a wax partition that is split diagonally and roll it tightly around the wick. The candle then gets a fine pattern from the hexagonal cells on the wax partition.
Your candles should reflect your style and vibe. Whether they’re statement pieces or simple decor, the effort you put into customization adds a unique flair. Don’t just settle for plain; add a bit of fun and personality to your creations.
Sustainability and Ethical Considerations in Beeswax Candle Production
Beeswax candles are more than a cozy addition to your home—they’re an environmentally friendly choice. When you use beeswax, you’re opting for a renewable resource that supports the planet. Unlike paraffin, which is derived from petroleum, beeswax is biodegradable and doesn’t produce harmful byproducts when burned.
Being mindful of where you source your beeswax is essential for ensuring its sustainability. Farmers who respect bee habitats and harvest wax responsibly contribute positively to the environment. When buying beeswax, check if it comes from ethical and sustainable beekeeping practices.
Supporting local beekeepers can make a significant difference. It promotes sustainability by reducing the need for transportation, which lowers the carbon footprint. Plus, by buying local, you’re boosting small businesses and helping communities thrive.
Stay informed about the environmental efforts linked to beekeeping you support. Everything from the bees to the beekeeper impacts the ecosystem. Choosing ethically-produced beeswax not only aligns with eco-conscious values but also encourages widespread sustainable practices.
Creating your beeswax candles is a small action with a big impact. Your choices can contribute to environmental sustainability and help combat issues like climate change. As you craft each candle, remember, you’re not just making something pretty or functional—you’re participating in a cycle of responsibility and care.
Hi,
I’ve always enjoyed the creativity of candle making. I enjoy going into candle stores with my wife. I especially like craft places like fairs where they craft candles.
This is a great informative guide to making candles from beeswax. I love how you emphasized the benefits of using beeswax, from its eco-friendliness to the natural air-purifying effects. The step-by-step instructions are clear, and the customization tips really make the process sound fun and creative. I also appreciate the focus on sustainability and supporting local beekeepers—it’s a great reminder that even small choices can make a big impact.
How do you ensure that essential oils don’t affect the burning quality of the candle? Is there a particular ratio or type of oil that works best?
– Scott
Hi Scott!
Thank you for your comments and question!
When you use essential oil together with wax to make candles, use only essential oil with higher flame point. If you have essential oil with low flame point, the candles will “sweat” and burn rapidly. You can also use fragrance oils that are more user friendly.
/Mats