
Beekeeping isn’t just about honey; it’s a fascinating hobby that connects you with nature in a unique way. But wait, before you rush out to get your gear, take a moment to learn the basics. Knowing what you’re getting into helps set you up for success.
First, why beekeeping? Besides the obvious sweet rewards, bees play a critical role in our ecosystem as pollinators. Keeping bees can be incredibly rewarding and educational. It’s not just about the honey; you’re helping to support environmental sustainability.
Next, ask yourself if beekeeping is the right fit for you. It requires commitment, time, and a bit of courage. Bees can sting, and hives need regular maintenance. If you’re comfortable with these, you’re already halfway there.
Before setting up a hive, consider a few prerequisites. Do some research about your local environment and regulations. Some areas have specific rules for keeping bees. Also, make sure you have the right space – your backyard should be bee-friendly and away from heavy foot traffic.
Joining a local beekeeping group or finding a mentor can be extremely helpful. Experienced beekeepers can offer valuable advice and support, especially in those tricky first months.
Choosing the Right Beehive for Beginners: Top Recommendations
Navigating through different types of beehives can be a bit overwhelming for beginners. Each type has its own set of advantages and considerations. Understanding these will help you make a well-informed decision.
- First, let’s talk about the Langstroth hive, which is the most popular choice. This type is modular and easy to expand as your colony grows. It consists of vertically stacked boxes, making inspections and honey extraction straightforward. However, it can get heavy when full, so be prepared for some lifting.
- Then there’s the Top-Bar hive. This horizontal setup is favored for its simplicity and low cost. It’s less intensive on your back because it doesn’t require lifting heavy boxes. The downside? Honey yield might be lower compared to Langstroth hives.
- The Warre hive is another option, often chosen for its natural beekeeping approach. It’s designed to mimic a tree trunk, which is a bee’s natural habitat. While it requires less frequent intervention, it can be a bit harder to inspect and manage for newbies.
- When choosing your first beehive, consider the climate of your location. Certain hives perform better in specific climates. Research local recommendations or consult with experienced beekeepers in your area.
Don’t forget to factor in your physical abilities and commitment level. Some hives demand more regular attention and physical work. Langstroth hives are great for those willing to invest time and effort. For a less labor-intensive option, the Top-Bar or Warre hives could be more suitable.
Lastly, quality matters. Don’t skimp on materials. A good-quality hive might cost a bit more initially, but it pays off in the long run with durability and better support for your bees. Choose reputable suppliers and, if possible, look for eco-friendly options.
Setting Up Your First Beehive: Step-by-Step Guide
Getting your first beehive set up can feel like a monumental task, but breaking it down into manageable steps helps calm those first-timer nerves. Let’s walk through it step-by-step so you’re not left buzzing with questions.
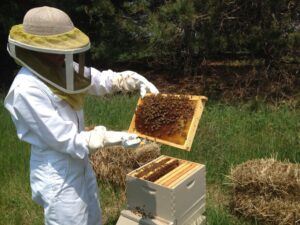
- First, gather your materials and tools. You’ll need the hive itself, frames or bars (depending on your hive type), a hive tool, a smoker, and protective gear like a bee suit, gloves, and a veil. Quality equipment makes a huge difference in ease and safety.
- When it comes to choosing a location, think about your bees’ needs and your safety. The spot should be sunny for most of the day, but ideally sheltered from strong winds. Bees prefer to forage in a 3-5 mile radius, so having flowering plants nearby is a bonus. Also, keep the hive away from high-traffic areas to minimize any unintended encounters.
- Legal considerations might sound dull, but they’re crucial. Check local regulations to ensure you’re compliant. Some areas have specific guidelines for hive placement and colony sizes. Ignoring these can lead to hefty fines or forced hive removals.
- Now, setting up the hive itself. Place the bottom board on a flat, raised surface to avoid moisture accumulation. Attach your hive boxes in the correct order and insert the frames or bars. Make sure everything is snug yet accessible for inspections.
- Sourcing your first bee colony is a key step. You can buy packages of bees, nucs (nucleus colonies), or even catch a local swarm if you’re feeling adventurous. Packages are generally easier for beginners, as they come with a queen and a group of worker bees ready to start building their home.
Once your bees arrive, it’s time to introduce them to their new home. Gently pour or shake the bees into the hive and place the queen carefully. Feed them sugar syrup initially to help them get established, especially if nectar sources are scarce when you start.
Patience is vital. It takes time for a new colony to settle and start producing honey. Regularly check on them without overdoing it. Too much disturbance can stress the bees. Enjoy the process and learn as you go. Every beekeeper makes mistakes, and that’s how you improve.

Optimal Conditions for Starting a Beehive: Timing and Environment
Timing is everything in beekeeping. The best month to start a beehive is typically in the spring. This season aligns with natural floral blooms, providing your bees with ample food sources for building their colony. Avoid starting in the cold months of winter, as the bees will struggle with food scarcity and harsher weather conditions.
Ideal weather conditions play a significant role too. Mild temperatures and low wind are best. High humidity and frequent rain can delay your hive activities, making spring or early summer the prime times to kick things off.
Opening a hive for the first time? Aim for mid-morning to early afternoon. Bees are less defensive then, busy foraging and less likely to be aggressive. Avoid windy and rainy days; bees get cranky just like us when the weather’s bad! Also, make sure you’re calm and confident. Your demeanor affects the bees’ behavior.
Deciding on the number of bees to start with can be tricky. Beginners should aim for one to two colonies. Starting with fewer bees makes it easier to manage and learn. Plus, if something goes awry, you have the chance to regroup and improve without feeling overwhelmed. Colonies usually come in packages containing around 10,000 bees; it sounds like a lot, but it’s manageable.
Monitoring hive conditions is crucial. Regular inspections help ensure your bees are healthy and the hive is operating smoothly. However, refrain from opening it too often. Too much interference can stress the colony. Most beekeepers recommend inspections every 7-10 days, especially during the initial months. Look for signs of disease, check the queen’s activity, and ensure there’s enough food supply.
Maintaining Your Beehive: Best Practices and Tips
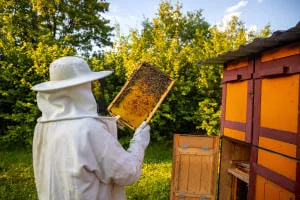
Regular hive inspections are key to keeping your bees healthy and happy. But how often should you open your hive? Aim for every 7-10 days to strike the right balance between monitoring and minimizing disturbance.
- During inspections, keep an eye out for a few crucial signs. Check for the presence of the queen and her laying pattern. A good queen lays eggs in a consistent pattern and should be easily spotted. Keep track of food stores too, ensuring there’s enough honey and pollen. Don’t forget to look for signs of pests and diseases, like Varroa mites or foulbrood, which could harm your colony.
- When you spot problems, act quickly but carefully. If you find pests, consider using natural treatments first. Many beekeepers swear by powdered sugar dusting to control Varroa mites. For diseases, reach out to a local expert or beekeeping association for the best course of action. Early intervention can save your hive.
- Seasonal maintenance is another aspect to stay on top of. In the spring and summer, focus on hive growth and honey production. Come fall, start prepping your hive for winter. Ensure they have enough food stored and consider insulating the hive against the cold. Regularly adjust your plans based on the bees’ needs and local climate.
- Your health and safety are just as important. Always wear your protective gear during inspections, including a bee suit, gloves, and veil. Keep your smoker handy to calm the bees as needed. And remember, stay calm and move slowly to avoid aggravated reactions from your bees. A calm beekeeper makes for a calm hive.
Maintaining a beehive is a task of patience, learning, and dedication. Enjoy the journey, grow with your hive, and soon enough, you’ll be reaping the sweet rewards of your labor.
Beekeeping starter course: An Introduction
This Free Online Course Includes:
- 5-6 Hours of Learning
- CPD Accreditation
- Final Assessment