
Splitting a beehive is a hands-on way to manage your bee colony, prevent swarming, and sometimes grow your apiary. When you split a hive, you often need to introduce a new queen to the split. This step is a big deal because how you handle the introduction makes all the difference between a thriving colony and a failed split. I’m going to share how I approach introducing a new queen after making a hive split, including tools I use, steps I take, and tips that help the process go smoothly.
What Actually Happens During a Hive Split?
Splitting a hive means you take some frames from a strong, healthy bee colony, usually with brood, food stores, and nurse bees, and move them into a new box. The split is now a minicolony that needs a reproductive queen to carry on. Sometimes, the split gets the old queen, and the parent hive raises a new one. But in most managed beekeeping, it’s pretty common to introduce a new, mated queen to the split, avoiding the risks and wait of queenless periods.
When you do a split, the bees get a bit disoriented and sometimes defensive, especially when they discover they have no queen. Adding a new queen right away or a day or two later gives you a better shot at success, but both methods come with their quirks. It’s important to keep things organized and avoid rushing, as being patient leads to higher success and happier bees.
Why Introducing a New Queen Can Be Tricky
Bees don’t always roll out the welcome mat for a new queen, even if she’s top-quality and mated. Worker bees are hardwired to defend their hive, and a strange queen’s pheromones trigger their alarms. That’s why carefully introducing her gives her a chance to be accepted, not attacked. I’ve learned that patience, timing, and having the right equipment really pay off here. Sometimes it goes super smooth. A few other times, I’ve had to redo everything because the bees wouldn’t accept her.
Letting the colony “cool off” and realize they are queenless often makes them more open to a new queen. Rushing can result in a dead queen and a frustrating do-over. That’s why waiting twenty-four hours before introducing is popular among backyard beekeepers.
Step by Step: How I Introduce a New Queen to a Split
Queen introduction isn’t just about tossing her in and hoping for the best. I’ve found it works best when it’s methodical and a little bit hands off. Here’s my usual routine:
- Wait after making the split: I leave the split queenless for 24 to 48 hours. This helps the bees realize their old queen is gone and makes them eager for a new leader.
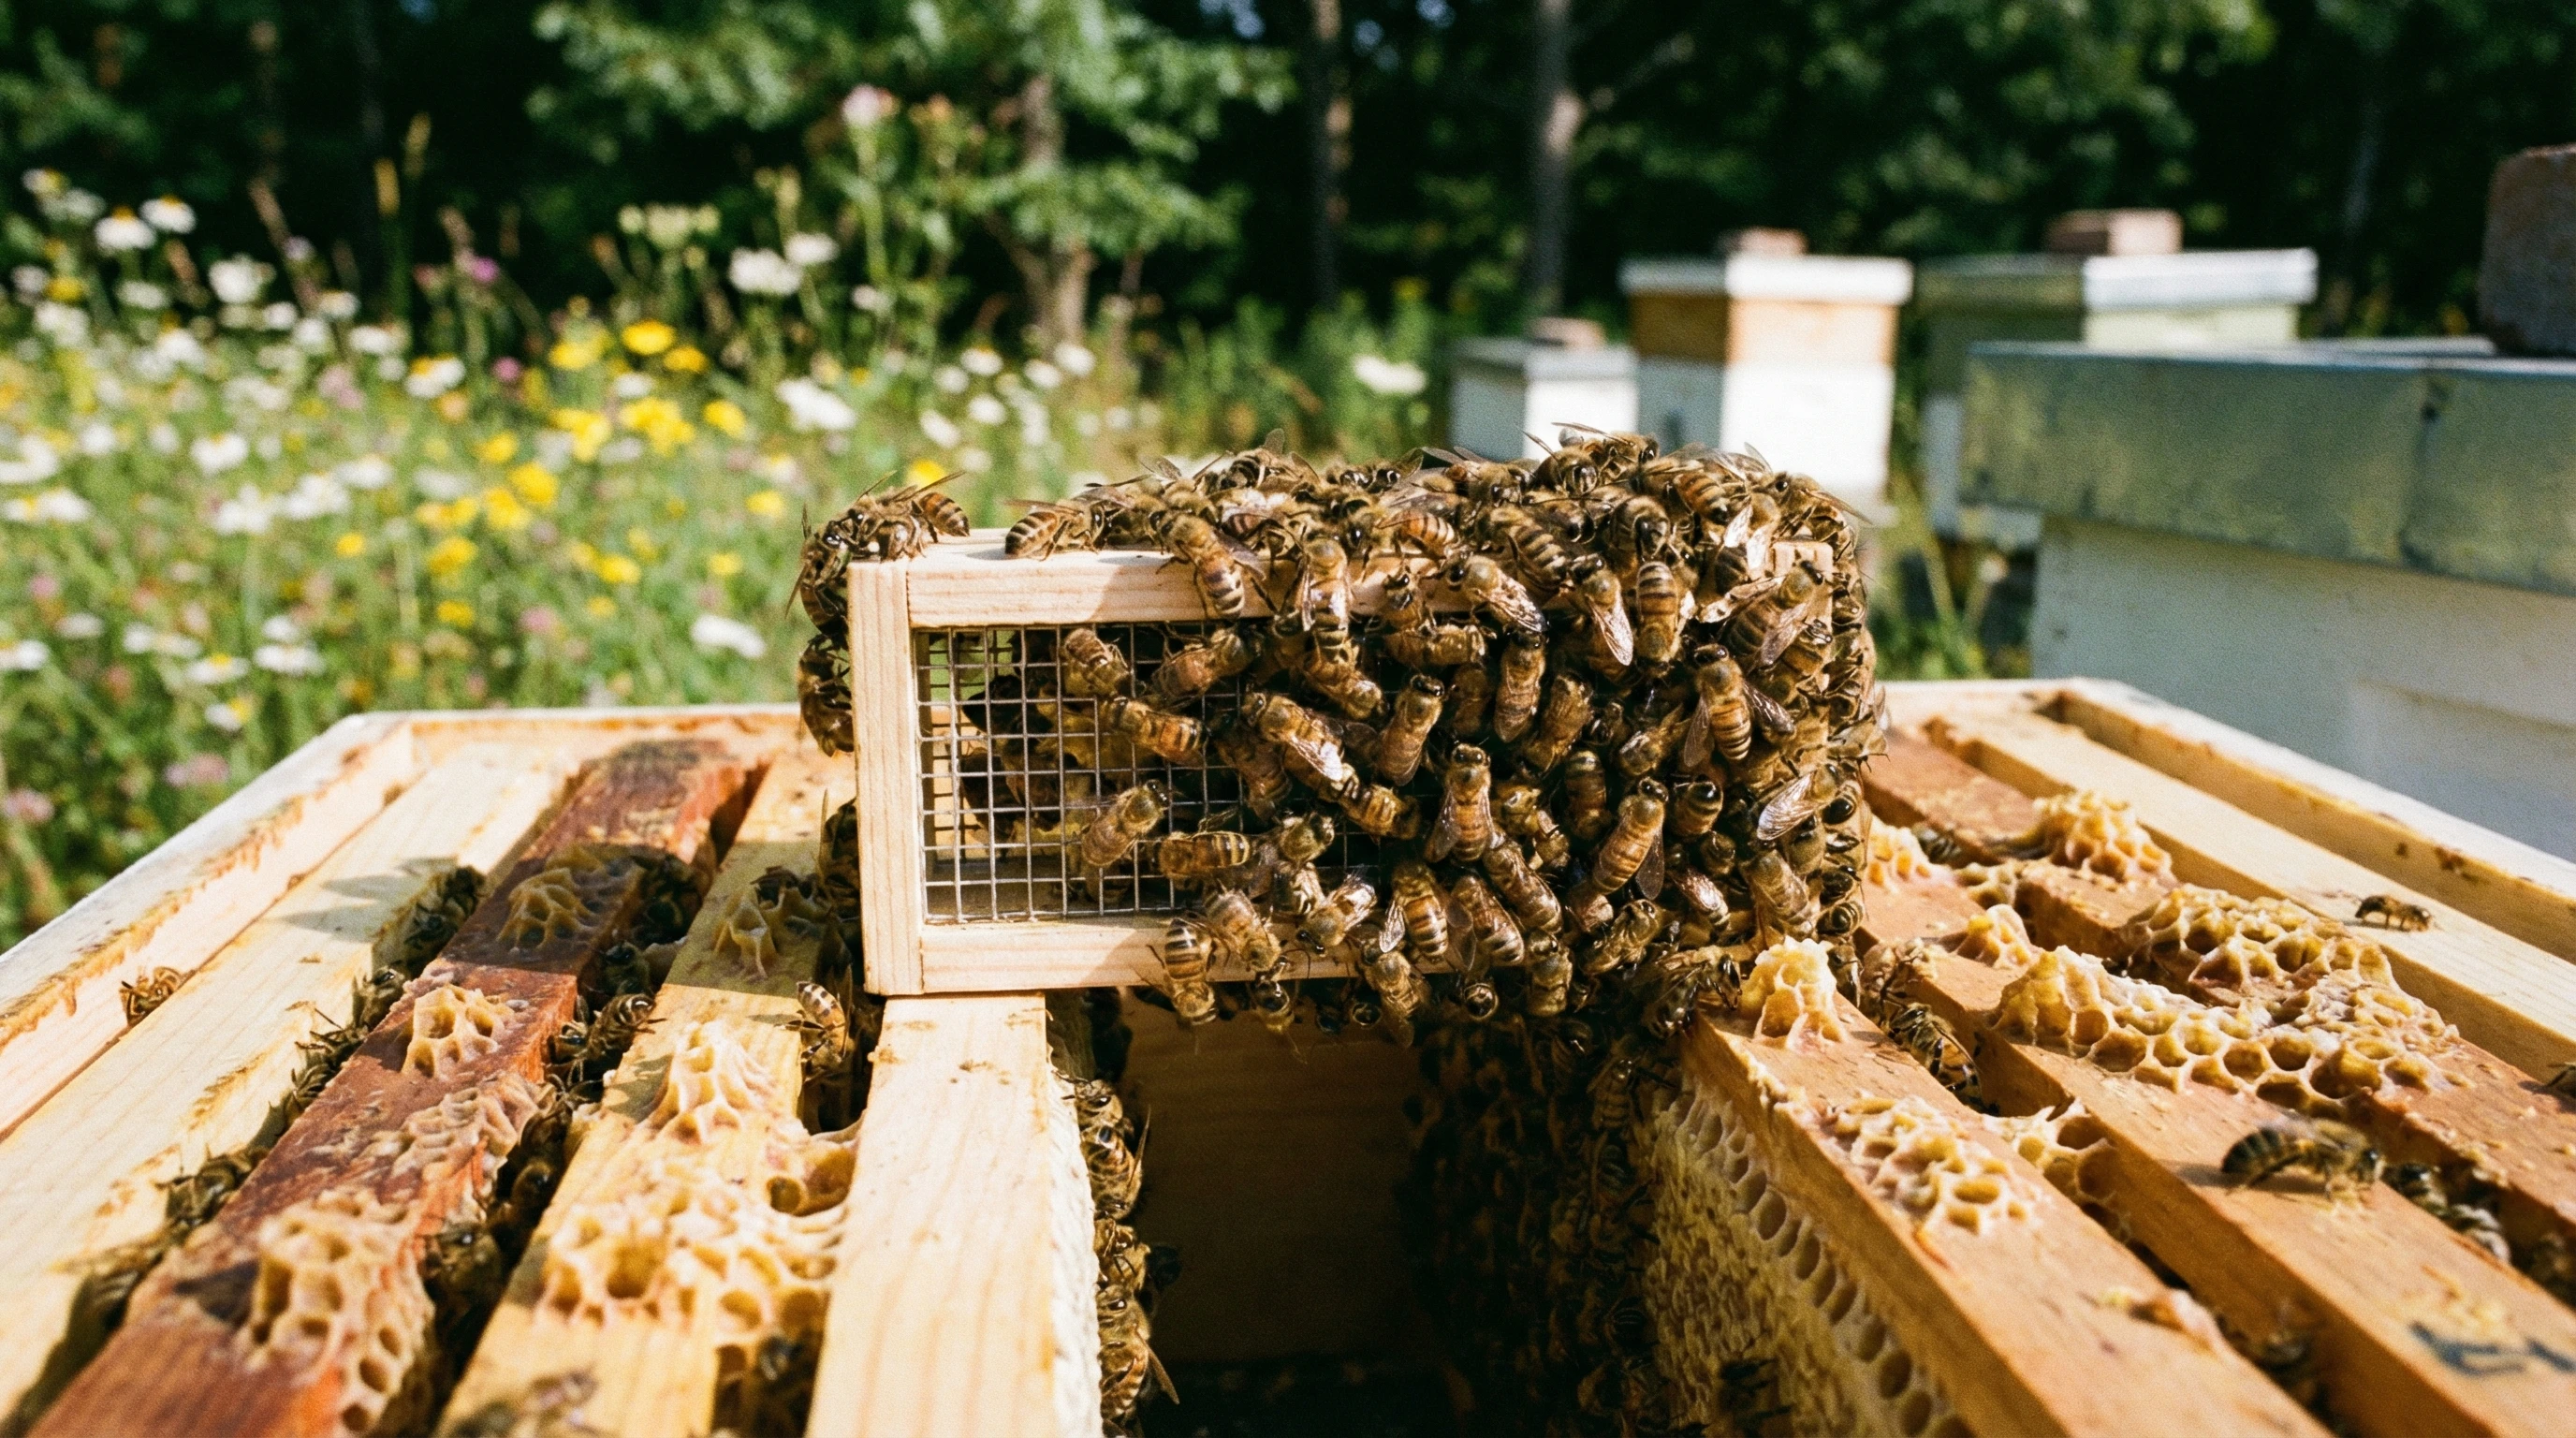
- Prepare the queen cage: Your new queen usually comes in a small cage with a candy plug and a few attendant bees. I don’t mess with this. The cage keeps her protected until the bees are ready to accept her.
- Place the cage in the hive: I gently hang the queen cage between two brood frames, candy end up. The bees can see, smell, and feed her through the mesh, which is important for gradual introduction.
- Monitor for acceptance: I observe the bees’ reaction through the screen. If they’re calm and feeding her, that’s a good sign. If they’re biting the cage, it’s not time yet, so I come back in a day. Mostly, within three days they’re ready.
- Candy release: Worker bees chew through the candy plug over a day or two, releasing the queen gradually. By the time she’s free, the bees are familiar with her scent.
- Follow-up inspection: I check back after three to five days. If eggs are present and the bees are acting calm, success! If the queen’s missing or there’s aggressive behavior, it may be necessary to try again.
This process works well for me. Making things slow and careful seems to get the best acceptance rate. If you get into the habit of giving your bees a little time, they often reward you by welcoming the new queen and getting straight to work raising brood. Some beekeepers like to wait even longer, especially if the colony has shown signs of stress, but I find 24–48 hours fits most splits nicely.
Common Mistakes and How to Avoid Them
I’ve hit some snags over the years during queen introductions. Here are some things to watch out for if you want to avoid repeat headaches:
- Skipping the wait after splitting: Introducing the queen right away sometimes leads to rejection because bees are still smelling their old queen’s pheromones.
- Direct release: Simply releasing the queen into a split often results in her being killed. I always use the cage method.
- Hive disruptions: Constant opening of the hive stresses the bees and can mess with queen acceptance. I keep hive checks minimal during this process.
- Old queen or queen cells present: Sometimes, the split may have missed queen cells or the old queen. Worker bees won’t accept a new queen if there’s already one around. I inspect frames twice to make sure they’re truly queenless before introducing.
Paying attention to these details has saved me a lot of stress and helped me build up strong new colonies from my splits. It’s smart to write down the dates and steps you take so you can spot any patterns—and avoid repeating the same mistake in future splits.
Tools and Equipment I Like to Have on Hand
Queen introduction doesn’t need fancy gear, but a few things make life easier:
- Queen cage: These come with new queens from reputable breeders. I save extras in case I’m introducing my own queens later in the season.
- Frame holder or hive tool: Lifting brood frames gently helps prevent injuries to new or existing queens and makes positioning the queen cage easier.
- Smoke or sugar syrup spray: A little calm goes a long way. A few puffs of smoke or a light mist of sugar water keeps bees docile during the process, but I try not to overdo it.
- Protective wear: I usually wear a veil and gloves, and when bees are queenless, they can get cranky.
These basics make the introduction process calm and smooth. I always keep things organized before I crack open the hive, since bees can get defensive if I fumble around too much. Having good lighting and being ready with your tools means you don’t have to stop midtask and upset the split.
Helpful Tips for a New Queen’s Smooth Transition
A gentle hand and attention to detail often give the new queen the best shot at settling in. Here are a few tips that have helped me:
- Introduce in the evening: Bees are less active and more likely to accept changes right before dusk, which slows aggression.
- Feed the split: Adding a syrup feeder helps stimulate comb building and brood rearing, giving the new colony a boost and reducing stress.
- Check for queen cells: Even after waiting, I double-check brood frames for rogue queen cells before introducing the new queen. If cells are present, the bees may choose their own queen over yours.
- Observe acceptance: Watching how bees interact with the cage is a simple but really valuable trick. Fast, aggressive bees mean trouble. Gentle bees mean good news.
Getting these basics down has helped my splits turn into good, productive colonies each season. Another tip to consider is to avoid introducing queens on very hot days, as extra stress can work against acceptance.
Other Queen Introduction Methods Worth Knowing About
While I usually use the standard cage release, there are other queen introduction methods that some beekeepers swear by. Some folks use pushin cages, which are hardware cloth squares pinned right over a section of emerging brood. This gives the queen a “home base” as she’s accepted. Others add a frame of open brood, which gets nurse bees focused on care rather than defense and subtly increases queen acceptance odds. It’s worth experimenting to find what works best with your bees and environment. If your bees are a testy breed, you might try the pushin cage more often or add a brood frame from a particularly gentle colony to help calm the split.
Real-World Applications: How a Successful Queen Introduction Pays Off
Once your new queen is up and running, the split colony gets to work building up, raising new brood, and expanding their stores. A healthy, accepted queen means balanced population growth and way less hassle for you through the season. I’ve watched weak splits bounce back and flourish once a new queen settles in. Having backup queens on hand has even helped me save hives that looked all but lost after a swarm or queen loss.
- Swarm control: Quick splits and queen introduction reduce swarm risk in strong spring colonies.
- Replacing failing queens: Weak, older, or poorly performing queens can be swiftly replaced during splits, giving hives new vigor.
- Apiary growth: Thoughtful splits and successful queen introduction lets you multiply your hives, filling out your apiary without buying new packages each year.
Successful queen introductions are a building block for sustainable, low-stress beekeeping. It takes a little practice, but it gets easier, and more rewarding, each time. If things go sideways with your first few splits, don’t get discouraged. Each attempt gives you more insight into bee behavior and helps you tweak your approach for next time. Soon, you’ll be able to spot acceptance or rejection signs at a glance and have strategies for a smoother introduction. Over the years, these skills can help you keep an apiary healthy, save money on new queens, and maybe even share extra hives with friends or family.
Frequently Asked Questions
I get a lot of the same questions from beginner beekeepers who are nervous about introducing their first queen. Here are a few practical answers:
Q: How long after splitting should I introduce the new queen?
A: I wait 24-48 hours. This gives the bees time to accept their queenless status and increases the chance they’ll accept the new queen.
Q: What if the bees kill my introduced queen?
A: It happens. Double check there’s no lingering queen or queen cells, and try reintroducing another queen after waiting a bit longer.
Q: Can I reuse the same queen cage?
A: If it’s clean and undamaged, yes. Just keep it sanitized between uses.
Q: Should I feed the split during queen introduction?
A: Yes, light syrup feeding helps reduce bee stress and improves colony buildup after the queen is accepted.
Gaining confidence with queen introduction is something every beekeeper figures out with a little time. With these steps and a bit of patience, you’ll soon see strong colonies and thriving bees, season after season.
Mats, I like how practical this is. The 24–48 hour wait, the cage method, and the “watch their behavior at the screen” approach feels like the kind of patience that saves queens and saves headaches.
I have not kept bees, but I recognize the pattern from other work with living systems. When you rush the transition, you get resistance. When you let the system settle, the change lands smoother. Your point about minimizing disruptions is probably the part beginners ignore most.
Question: when you check the cage, what exact behavior tells you “safe to release” versus “they’ll ball her the moment she’s out”? And if you find a rogue queen cell after you already placed the cage, do you pull the cage and restart the clock, or can you remove the cell and continue with the same timeline?
John
Hi John!
Thanks, John, that’s a great observation, and you’re spot on about patience being the real skill here. When it’s safe to release, you’ll see calm workers facing the cage, feeding the queen through the screen, and no biting or frantic clinging; aggression looks like tight clustering, buzzing, or trying to sting the cage. If I find a rogue queen cell, I remove it immediately and keep the caged queen in place, then extend the wait another 24 hours to be safe. Rushing almost always backfires, but giving the colony time to accept the change usually pays off.
/Mats