Queen bee rearing might sound like a head-scratcher at first, but trust me, it’s a fantastic adventure once you get the hang of it. The idea is pretty straightforward – you’re helping to grow your own queen bee to lead a healthy, buzzing hive. Why does this matter, you ask? Well, a queen determines not just the size of the hive, but also its health, productivity, and overall vibe.
Let’s switch gears and talk about what makes these royal ladies so crucial. Every hive has a single queen bee reigning supreme, whose primary duties are laying eggs to sustain the colony and releasing pheromones to maintain harmony and keep everyone in line. Without her, things can get pretty chaotic, leading to a weak or failing hive.
There are some real perks to raising your own queen bees, especially if you’re serious about beekeeping. You get to control the genetics and, therefore, the hive’s characteristics – like choosing bees that are calmer, disease-resistant, or maybe better honey producers. Plus, homegrown queens often adapt better to their environment, boosting your hive’s chances of thriving.
Before you get started, it’s key to get a grip on some basic terms. You’ll come across words like ‘grafting’, ‘queen cells’, and ‘mates’ – all crucial in queen rearing lingo. Grafting is about transferring larvae into queen cups, queen cells are where the future queens develop, and successful mating means your queen hit the jackpot with some healthy drones. Knowing these basics sets a solid foundation for your beekeeping journey.
Choosing the Right Queen Bee Rearing Kit
Stepping into the world of queen bee rearing? Picking the right kit is your first big move. So many kits out there claim to be the best, so how do you find the one that suits you? Let’s break it down together.
First things first, think about your own needs. Are you keeping it simple with a small-scale setup, or dreaming of a bigger operation? Kits come in various sizes and with different features, tailored to different goals. Whether you’re a newbie or aiming for professional finesse, there’s a perfect fit out there.
Beyond size, consider what’s inside. Many kits come packed with goodies like grafting tools, queen cages, and cell bars. Check if these extras are up your alley, or maybe you’d prefer a more minimal approach. It’s all about what feels right for your workflow and comfort level.
Budget is another player in the game. Kits can vary widely in price, influenced by brand, quality, and what’s included. A higher price tag might mean better durability or a larger number of items, but it’s not always necessary to break the bank to get what you need.
Let’s weigh some options. A popular choice among many beginners is the more affordable, basic kit. It usually includes the essentials without the bells and whistles. On the flip side, advanced kits offer more tools for intricate tasks, great if you’re planning to dive deeper into the process.
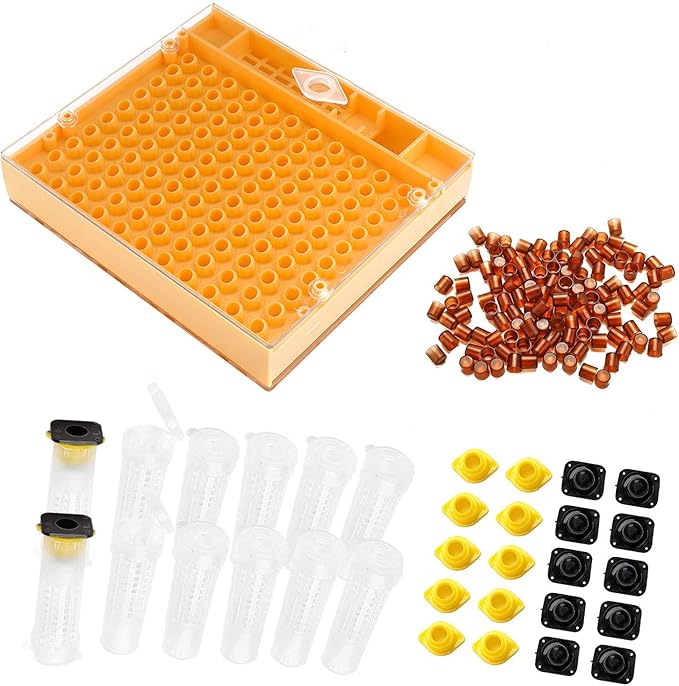
One example is the Nicot queen rearing system presents an easy way to raise new queen bees. The plastic box can hold up to 120 cell cups and is secured into a frame of brood. A queen is placed into the plastic box, where she will lay eggs. The cell cups can then be removed and placed in a mating hive ready for queen cells to be formed.
Take the time to look at reviews and recommendations. Fellow beekeepers’ experiences can shine a light on what’s genuinely user-friendly or packed with good quality material. Remember, investing in a solid kit sets the stage for a smoother queen rearing experience, giving you one less thing to stress over when you’re getting started.
Setting Up Your Queen Bee Rearing Kit
Getting your queen bee rearing kit up and running is like setting the stage for a rock show—everything needs to be just right so the magic can happen. Once you’ve got your kit, it’s time to dig into the setup process.
- Start by picking a prime spot. Think about factors like accessibility, safety, and environmental conditions. You’ll want a location that’s easy for you to reach but not too exposed to the elements. Some shade can be helpful, but ensure there’s still plenty of sunshine for your bees.
- The environment you create is crucial. Bees are sensitive souls, and they thrive in specific conditions. Pay close attention to temperature—ideally somewhere between 68°F to 86°F (20°C to 30°C)—since this range helps in proper development. Humidity and light also play roles. Too much moisture or darkness can be a buzzkill, so keep everything balanced.
- Setting up the toolbox of the kit starts with organizing the essentials. Assemble cell bars and grafting tools following the kit instructions—take it slow and steady. Familiarize yourself with each tool and its purpose. This not only makes the setup smoother but also boosts your confidence when working.
- Watch out for common pitfalls. Beginners often rush the setup, leading to avoidable mistakes. Like, double-check how secure your frames are to avoid them crashing. Take your time, double-check each step, and remember: a solid setup is like building the foundation of your hive’s success.
Setting things up can seem overwhelming at first, but it’s all about getting into a rhythm. Once you find your groove and have the setup nailed, the rest of the rearing process becomes a whole lot easier.
The Rearing Process: From Egg to Queen
After setting the stage with your rearing kit, it’s time to dive into the real action—transforming eggs into fully fledged queens. This journey is like watching nature’s drama unfold, with each stage bringing its own set of thrills and challenges.
- Let’s start with the eggs. The first thing you’ll notice is how tiny they are within their cells. As those eggs develop into larvae, it’s time to switch gears. You’ll carefully move these larvae into the queen cups—a process known as grafting. This step needs a steady hand and a relaxed mind since you’re handling future queens.
- Feeding comes next, and it’s vital. Nurse bees take over from here, but keeping a close eye on their work and ensuring they’re well-fed is key. Royal jelly is what they need—it’s packed with nutrients essential for queen development.
- As the larvae pupate inside their cozy cells, ensuring everything remains quiet and undisturbed is important. Too much disturbance can throw off their groove, leading to issues with development. Patience is your best buddy here as you wait for the miracle of transformation.
- Then comes the emergence of your new queens. You’ll want to ensure they’re ready before introducing them to the hive. Remember, the hive’s acceptance of a new queen is make-or-break. Monitoring their behavior closely, checking for signs of aggression or distress, helps avoid queen rejection.
Challenges? They’ll pop up now and then. Things like larvae becoming chilled or queens getting rejected by workers are part of the game. But every challenge is a learning opportunity, helping you refine your technique and improve future cycles.
Best Practices for Maintaining a Healthy Hive
Once you’ve successfully reared your queen, it’s all about keeping things running smoothly in your hive. A healthy hive doesn’t just happen; it’s the result of ongoing care and observation.
Start by checking in on the hive regularly. A quick peek can tell you if your queen is laying eggs properly and if the worker bees are doing their thing. Look for good brood patterns and plenty of new eggs—it’s a sign your queen is thriving.
Address any signs of trouble early. Issues like dwindling bee numbers or strange bee behavior can be red flags. You might need to intervene with solutions, such as disease control or feeding supplements during lean seasons, to keep things balanced.
While things might seem peachy, stay on your toes. Monitoring for pests and diseases is crucial, as these can sneak in and wreak havoc. Regular inspections can help you catch problems before they escalate, saving you headaches down the road.
Consider keeping a journal or log of your hive’s progression. It may sound old school, but tracking changes and noting down challenges and successes gives you a wealth of information to draw upon for future queen rearing projects.
Planning ahead is key to sustaining a productive hive. With the knowledge and skills you’ve gained from this experience, you’re now set to tackle more rearing adventures with greater confidence. Whether scaling up or refining techniques, you’re on the path to becoming a pro at queen rearing.

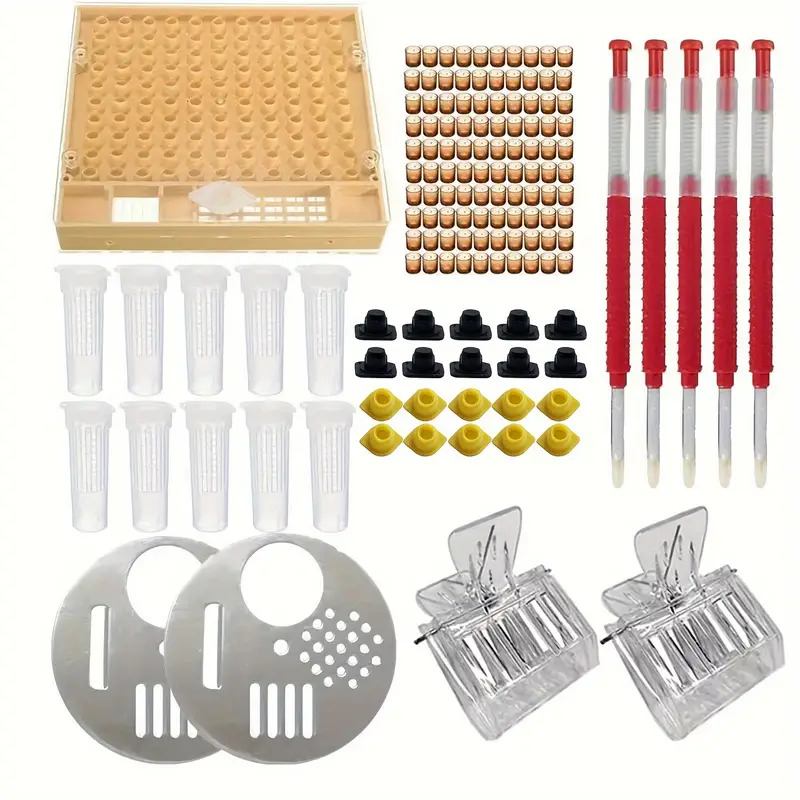
This queen rearing equipment set is quite simple and can produce prolific reliable results. One set: 110 cell cups, 10 cell bar blocks and c-aps, 10 cages and one box in this set

Packaging includes:1xQueen Rearing Box +110xCell Cups+10xCell Bar Blocks and Caps+10xCage+5xBeekeeping Moving Grafting Tools+2xPlastic Bee Queen Clips+2Honeycomb door Made from high quality plastic:it is non-toxic, harmless to bees and light weight.
EASY TO USE

This post offers a wonderfully insightful introduction to queen bee rearing, breaking down complex concepts into digestible parts. The emphasis on the queen’s role in hive health and productivity is particularly enlightening. I’m curious about the specific challenges new beekeepers might face during the grafting process and how to best overcome them. Understanding these hurdles could enhance the learning experience for beginners eager to embark on this rewarding journey.
Hi Cyril!
Thanks for your comments and question!
New beekeepers sometimes face challenges in selecting young larvae, handling them delicately, and maintaining ideal hive conditions. Using the right tools, practicing with dummy larvae, and ensuring a strong, queenless starter hive help overcome these hurdles. In this handiwork, patience and close observation improve success over time.
/Mats